Teaching the joys of STEM with robots and multiplayer programming
StarLAB is something we need more of — tech built by a team of engineers to help students learn together. In this case, they get to learn to build cool robots! I spoke with Clinton McKinnon, the Electrical/Marketing Engineer at Obelisk Systems, about StarLAB and their platform.

The Obelisk Systems team with their StarLAB kits and rovers!
Like many great projects, this one was born from a great place — the desire to put together a “cool toy”. It then grew from there:
“StarLAB is the product of our four friends who set out to make a ‘cool toy’ and along the way it developed into a proper STEM education platform for school students across all ages.” — Clinton McKinnon
The best bit? Their aim is to provide this to students even if they have no coding experience — this is seriously the sort of platform I wish existed when I was learning to code! Clinton says that all students need to have is “a willingness to have fun, make mistakes, and learn”.
The language they focus on in their StarLAB program and materials is Python — which is taught through online modules and tinkering with the hardware kit.
Multiplayer programming
One of their strengths lies in a pretty ingenious concept — allowing multiple students to code on the same hardware… at the same time! When it comes to teaching children technology, you want as many barriers to entry removed as possible. Allowing for multiple students to code on the same hardware would streamline this and also help reduce the amount of hardware you need for a big class of kids.
“As we further developed the API, I came up with a few unique tools that used the wireless networking available in our hardware to come up with a feature we’ve dubbed “multiplayer programming” that actually allows multiple students to code on the same hardware at the same time.” — Clinton McKinnon
The StarLAB hardware platform
The StarLAB platform is built upon the Raspberry Pi 3 and their hardware kit comes with a whole range of stuff including an accelerometer, gyroscope, magnetometer, three thermometers, a pressure sensor, moisture sensor, HD camera, buttons, a piezoelectric buzzer and more — all ready for students to use to learn robotics.
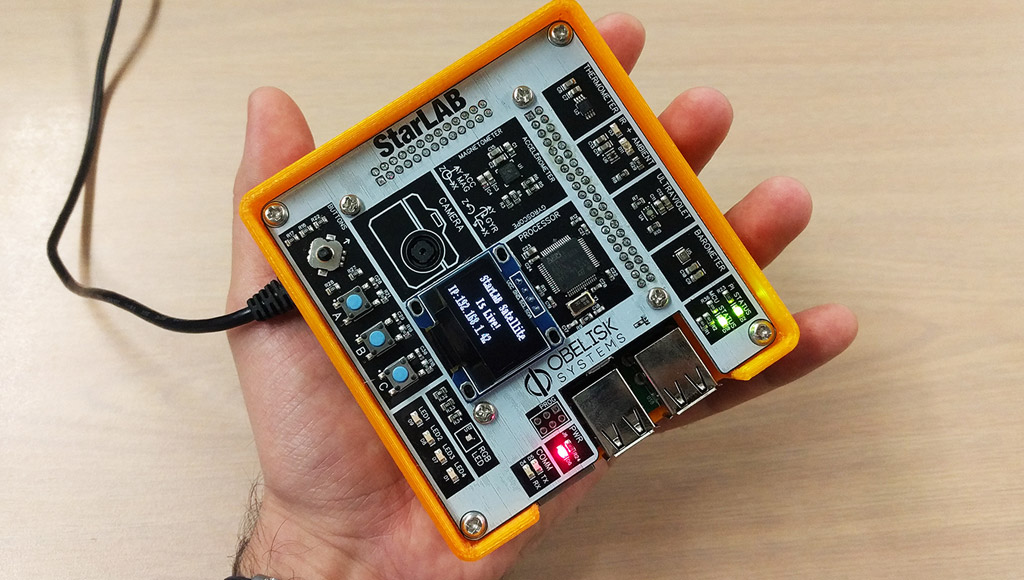
The StarLAB hardware connected and blinking away!
The Raspberry Pi was chosen as a “network capable device that students could use standalone if they didn’t have another computer available to them”. It has proven to be a good choice, as they’ve been able to do a whole range of stuff on the Pi-based StarLAB hardware and software to get it working in school environments:
“To work with the variety of networks that exist in a school environment we re-wrote the network manager, as well as improved the password security. We also have our customised StarLAB software which does the work of allowing students to engage in collaborative coding as well as interact with the world around them through the sensors and expansion platforms.” — Clinton McKinnon
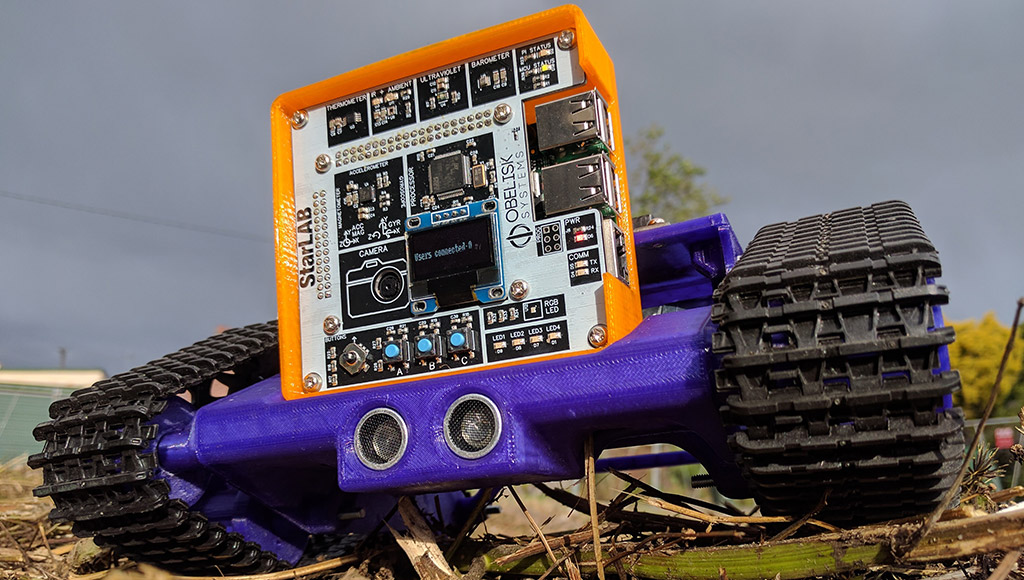
Their Mars Rover kit
Taking the existing StarLAB hardware, they’ve put together an add-on kit that helps students make a rover-style robot that they can drive around. Clinton explains,
“Our first robot is an expansion/add-on of the main StarLAB platform which we’re calling the “Mars Rover expansion”. It’s a tank style chassis which the StarLAB mounts on top of. Students connect to and program the rover through the StarLAB, which allows them to move the rover around as well as read sensors such as the front mounted distance and power sensors.”

Now that’s a pretty cool robotics kit right there.
It’s a great way to learn because nothing is hidden away — enthusiastic students can spend time and really understand the whole set up if they want to. I personally really like that.
“We’ve tried not to hide any of the components of the StarLAB and Rover, kids can see every part of how the electronics fit together to make their Rover work.” — Clinton McKinnon
How long does it take to build one?
My next question inevitably led to — how long does one of these take for students to put together? Time is often quite scarce in learning environments like these — but it looks like the kit doesn’t take too long, a reasonable morning or afternoon’s work at most, but with the potential for more to be done in future sessions:
“One to two students can easily put together our Rover expansion platform within a few hours, it’s a custom designed 3D printed chassis that can be put together with a single screwdriver, no soldering required. Once all the building is done the coding platform means that there are still months of learning and experimentation to be done!” — Clinton McKinnon
What better way to learn than with a customisable rover?
STEM and robotics are skills for the world of today
I’m going to end this with a quote from Clinton which he said wonderfully:
“Some people see STEM and robotics as “skills for tomorrow”, I don’t like that because people are always doubtful of things that try and predict the future. The reality of the world is there are STEM and robotics jobs right now! It would be a big missed opportunity to let today’s kids miss the fun of the already changed world.” — Clinton McKinnon
If you are a student looking to get into coding and robotics, or a parent of a student who’d love this sort of thing — tell your school about the StarLAB program! You can find out more on the StarLAB website or get in touch with them to find out more. They also made an appearance in our CeBIT Australia 2017 roundup video!
Would you like to republish this article in your own publication?
Contact Dev Diner to request official republication of this article.
Contact Dev Diner to request official republication of this article.
Want more?

A neat way to add I/O with the physical world — the Wio Terminal
The world of micro-controllers and maker creations is a vast and ever-growing one that can be super intimidating to newcomers. Should you start with an Arduino? A Raspberry Pi? What's an ESP something something? How do you add a screen? Sensors? The team at Seeed Studio are trying to make things easier and their Wio Terminal looks like a nice option for those who want to start with a screen and some sensors.

Building a 3D printed AR headset with The Triton Project
It's always exciting to stumble upon another AR headset being developed! Graham Atlee has been putting together The Triton Project, an exciting new headset similar to Project North Star that can be put together with off-the-shelf parts! Here's a Q&A with Graham on how it came about and how you might be able to get your hands on one!